Complete the following steps to configure General Auto Attendant settings.
Configuring General Auto Attendant Settings
Share or Print This Article
Solution
1
From the Auto Attendant page, click General Auto Attendant Settings to expand the menu.
Result: Additional fields and options display.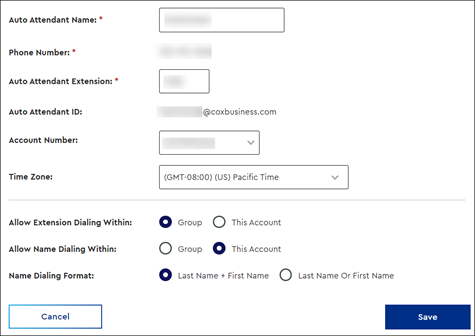
2
Complete the following steps.
- In the Auto Attendant Name field, enter a name.
- Click the Phone Number drop-down menu and select a phone number to assign the Auto Attendant feature to.
Result: The Auto Attendant Extension field auto populates with the last four digits of the phone number entered.
3
Click the Account Number drop-down menu and select the account to associate with Auto Attendant.
Note: Multiple account numbers display if a business has more than one location.
4
Complete the following steps.
- Click the Time Zone drop-down menu and select the appropriate time zone.
- In the Allow Extension Dialing Within field, select one of the following radio buttons.
- Group
- This Account
- In the Name Dialing Format field, select one of the following radio buttons.
- Last Name + First Name
- Last Name Or First Name
Note: Provide dialing instructions to callers in your recording.
5
Click Save.
Result: A message displays, indicating that Auto Attendant settings have been updated successfully.

Cox Business MyAccount Updates
Cox Business MyAccount Updates
With the new and improved MyAccount portal from Cox Business, you’re in control. Included with your Cox Business services, it’s all right at your fingertips anytime, anywhere.
- Perform a health check on your services and reset your equipment
- Easily configure key features and settings like voicemail and call forwarding
- View your balance and schedule payments
Search Cox Business Support
Search Cox Business Support
Didn't Find What You Were Looking For? Search Here.